
My Podcast Set-up
I like it when other podcasters share their set up. A thanks to Leo Leporte, one of my favorite tech podcasters….or is that netcaster. I’ve learned a lot about podcasting just listening to the different shows he produces.
I wrote this page for the Shifting Our Schools site to share with others the set up I use to stream, record, and converse all at the same time. I thought I’d share it here as well. You can find links to the different equipment I use at my Amazon Store as well.
The Set Up:
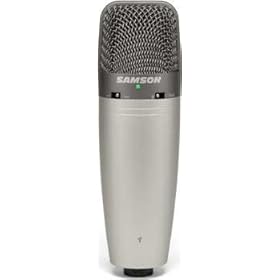 It all starts with the Mic! You’ve gotta have a good mic to feel like you really are producing something of quality. Besides, you want the quality. I use the Samson CO3U USB Mic. I love this thing. Mounted on a shockmount, the sound quality is fantastic and you get little to know vibration noise.
 Next you need a piece of software to record your podcast into. I’m digging GarageBand on the Mac, but love Audacity (Mac and PC) as well. Both programs are simple enough for you to get started, and both can expand and give you the control you want over your audio.
We’ll need a way to get the audio from Skype if you are doing an interview into the audio stream. I try and do things as cheaply as possible. On a PC I use Virtual Audio Cables (free) which will take the sound and pipe it through your sound card so that Audacity can pick it up.
 On my Mac I’m finding this step to be so much easier. After reading all the reviews I broke down and bought WireTap Anywhere. This program is awesome and worth the $129 price in my opinion. You can watch the video on the site, but it is really just that easy. Tell WireTap that you want the audio from the Samson Mic and from Skype and you want it to be pushed out to GarageBand and the sound card. You can add sources on the fly, and best of all…it just works! The one thing to note is that you will want to start it before you start Firefox for streaming on the web.
OK, so now we’ve got the mic, the software to record and the system in place to push all the audio you want through your sound card we’re on to the fun stuff.
You’re gonna want some intro and exit music. You can spend a lot of time on the web searching for that perfect sound, that prefect entrance to your recording. I find Free Play Music to be a great site with loads of free to use sounds and short loops.
Or if you really want something original you can use a paid service like Beat Suite. A great site that has original sounds and all of it is Royalty Free.
If you want to stream live using a service like ustream.tv or stickam.com is easy enough to do. Just sign up for an account, create a channel and allow your audio to be piped out over the internet.
 Now that we’ve got all that sorted it’s time to talk about editing your file. There are many tips and tricks you can find on the web, and at the end of the day no matter how good you are at setting the volume it always seems to be off. This person is to loud, that person can hardly be heard. Thanks to a free program created by podcasting experts you can now level your sounds to perfection. The Levelator is a must have for any podcaster. It’s simple drag and drop any .aif or .mp3 file on the program and it will level the sound for you and give you a new file that makes everyone sound perfectly the same.
So here’s how I edit my podcasts:
- I record straight into GarageBand
- I edit the recording in GarageBand, take out the mistakes, the Skyp recalls, and anything else that doesn’t sound right.
- Next I export the file in .aif uncompressed format. This keeps the sound as original as possible. I take the .aif file and run it across the Levelator to get my three or four voices at all the same level.
- Take the output track from Levelator and import it back into GarageBand. Add the intro and exit tracks (some people do this before they use Levelator….it’s up to you as I’ve found the quality to be no different) and then export as an mp3 file.
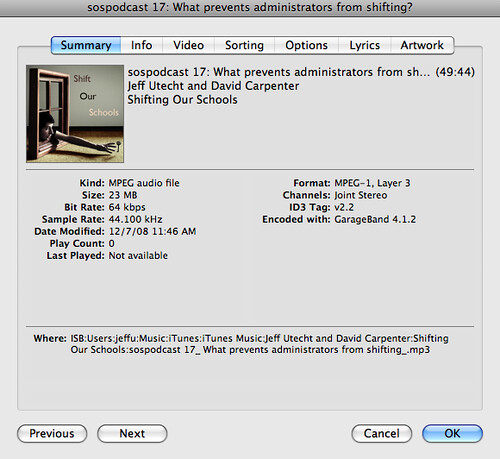
- In GarageBand I export to mp3 format at good quality. Because it’s only voice 64kbps is good enough. We’re not going to get CD quality out of a Skype call anyway and quality means size. I’d rather have an hour long podcast at 23MB than at 46MB and really not have a sound quality difference. If you look at most podcasts through iTunes you will notice that most are rendered at 64kbps.
- Next import your mp3 file into iTunes (I have a playlist called podcast just for this reason). iTunes makes it easy to edit the ID3 Tag. The little information that accompanies the mp3. This is where the title is stored, the producer, and that all so important image art that shows on the iPod.
- Lastly you need a place to put your file so others can access it. Using a blog is great, as it comes with a built in RSS Feed. People can subscribe to your podcast blog and listen to your podcast right in their reader. Or head over to iTunes click on Podcast and in the middle of the screen you’ll see the button to “Submit a Podcast”. You’ll need an RSS Feed, but after that you will have your own podcast site on iTunes. Just keep uploading files and linking them into your blog posts and iTunes will pick them up. For an easy way to do all this I recommend using a WordPress blog with the popular Podpress plugin. Or look at other options like Podango which give you a place to host your files.
So that’s it…Jeff’s guide to creating podcasts. Head on over to sospodcast.org and listen to our latest episode that was created using the equipment and steps outlines above. Or head directly to iTunes to add use to your podcast list.

Jeff.
thanks for sharing your set-up. The samson mic is great, although i tend to mostly use a plantronics headset since i don’t do interviews. for a great source of free, creative commons licensed music, though, give Jamedo a try. They have more than 13K albums with CC licenses. i’ve taken quite a few songs from there for my podcast intros and background music. some of the best are at my wiki, http://brianbridges.pbwiki.com
and thanks for your great posts.
brian
Jeff: This is a great write-up and summary! Thanks for sharing it. It is valuable to have you line out your entire podcasting workflow. I’ve dabbled with the Levellator but don’t use it regularly. Perhaps I should. I tend to keep my formats compressed (WMA as raw from my recorder, and then MP3 from Audacity) so the fact that just supports uncompressed formats is a drawback for me.
In addition to recommending PodPress, you might consider recommending Blubrry Powerpress. It is a WordPress plugin for podcasting as well, and seems to have a similar feature set to PodPress but also includes Zune Marketplace directory listings. (I’m not saying that is a feature to die for, but this is an alternative to Podpress.)
I am totally invested in PodPress at this point as all the links in my podcast feed are the PodPress counting redirect links, but I may give Powerpress a try on the next WordPress podcasting blog I setup.
Nice post Jeff. However, you really should go back and look at the terms of use for FreePlay music. In a nutshell, unless you are a Hollywood movie mogul, you will need to pay for the clips you use in a podcast. It’s a real bummer because they have the best clips anywhere.
Thanks John,
I’ll go back and read it again, as when I read it last night that’s not how I understood it to be. It’s hard to get something for nothing these days. 🙂
Mr. Scofer,
Been a long time since I’ve made any comments.
I’m listening to the SOS podcast linked in this article.
It’s quite a step up from the first talks with your principle in your office at Shanghai American. Too bad Skype is so iffy on it’s quality.
I may just give virtual sound cables a try. I haven’t put audacity on this computer. But I probably should.
And of course, it sounds like your doing good work.
Was is Seattle this weekend. Seattle says it misses you! HA.
Later.
[…] out the full post at http://www.thethinkingstick.com/?p=815. It is worth the time! This entry is filed under podcasting. You can follow any responses to […]
[…] The Thinking Stick | My Podcast Set-up […]
[…] The Thinking Stick | My Podcast Set-up […]